Working with telescope
PushTo aid
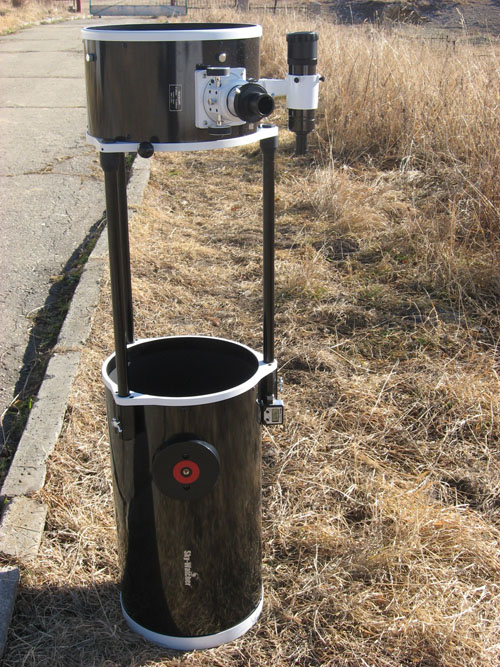
- Figure 17: Dobsonian telescope with simple setting circles
(OTA setup)
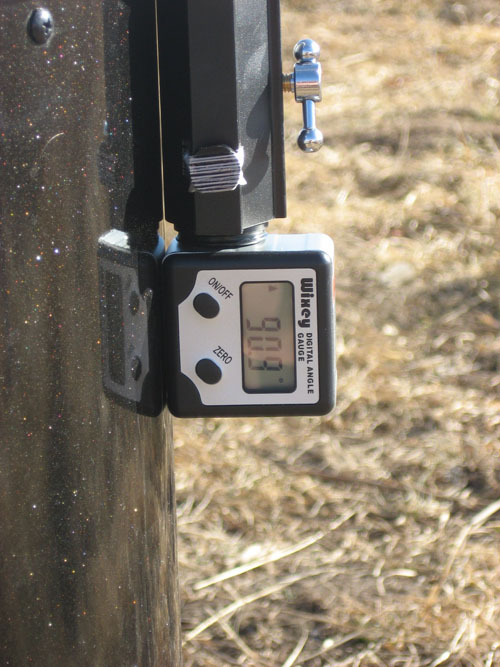
(inclinometer)
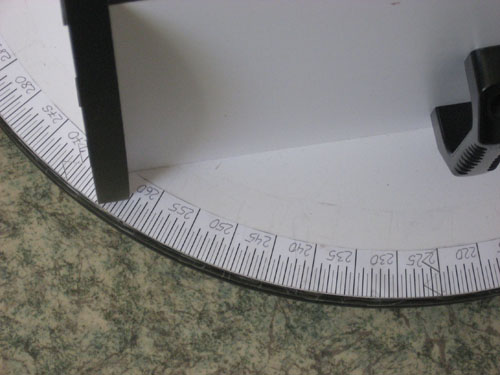
(DIY azimuth circle)
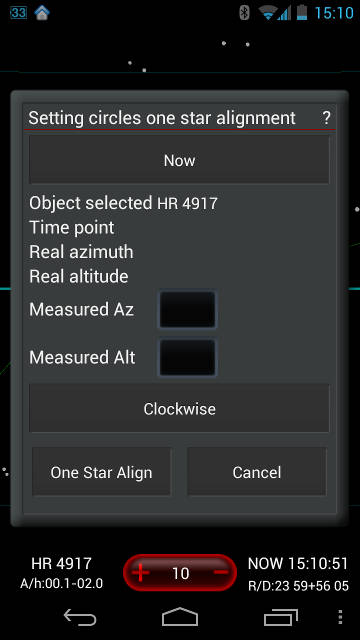
(one star alignment panel)


Overview
DSO Planner have the ability to work with the setting circles' readings for telescopes with Alt-Az mount. The dedicated calibration algorithm allows use them for "blind" objects finding without precise alignment of the setting circles to the true North and horizon points. Usually it is sufficient to just level the telescope's base with a simple bubble level and perform the single star alignment, using the special Alignment panel of the app. The telescope's base must be precisely level for correct calculations of setting circles Azimuth readings, however, if you cannot level the base reliably, you can Star Align as usual but work on a small region of the sky close to the alignment star by Azimuth (i.e. in a 20 degrees arch left and right for about 20 minutes) without losing much of a precision. Then just re-align to other star in the close vicinity of the objects you want to study.
DSO Planner's author has a Dobsonian telescope pictured above. The Azimuth circle is printed on paper and glued to the mount base, it has 0.5 degree steps. The classic Altitude circle is substituted with an inexpensive constructors grade digital inclinometer with a 0.1 degree accuracy. With practice and the help of DSO Planner, such a basic upgrade of the Dob could shorten the finding of almost any object in the Sky in under 2 minutes!
One star alignment
- Select a bright enough alignment star on the Star Chart.
- Using the Chart, point your telescope to that star using a high power eyepiece for higher precision.
- Select the "Align Star" item from the Star Chart's Main Menu to open the "Setting circles one star alignment panel".
- Confirm that the star is precisely at the center of the FOV of your eyepiece once again,
- and immediately tap the "Now" button on the alignment panel to precisely register the current moment of time.
- Read your setting circles (or inclinometer), and
- enter the Azimuth and Altitude values in decimal degrees into dedicated data fields on the panel ("Measured Az" and "Measured Alt").
- Select azimuth setting circle direction ("Clockwise" or "CounterClockwise").
- Tap the "One Star Align" button to save the alignment data.
The "Clockwise" / "CounterClockwise" button below the coordinates input fields of Alignment panel allows to select a different direction for the Azimuth setting circle, as some models might be graduated clockwise and most counterclockwise.
How to use
Now, you need to tell DSO Planner to show the Altitude and Azimuth of objects on the Star Chart in the coordinates space of your telescope mount.
- Open the Main Menu of the Star Chart.
- Select Settings.
- Find the "Equipment" section and tap the "Telescope" item.
- Turn on the Show adjusted Az/Alt option there.
From now on, DSO Planner will calculate all the necessary adjustments for your setting circles on the fly, and show the adjusted coordinates for any object selected on the Star Chart (they are displayed in the left bottom corner of the chart with "%" sign followed by values).
To point the telescope to an object from the chart:
- Select the desired object on the Star Chart.
- Make sure the Chart is set to the current time:
- Tap the "Time/RA-DEC" info bar in the right bottom corner of the Star Chart to open the "Pick date and time" panel,
- either set it manually, or turn On the Real Time drive mode for the Chart - tap the "RT ON" button (if it's ON already the button's label will be "RT OFF" instead, and the "Time/RA-DEC" info bar will show "NOW" word).
- Dial your telescope circles to the values provided in the "Object Name/Az-Alt" info bar in the left bottom corner of the Chart.
Bluetooth GoTo
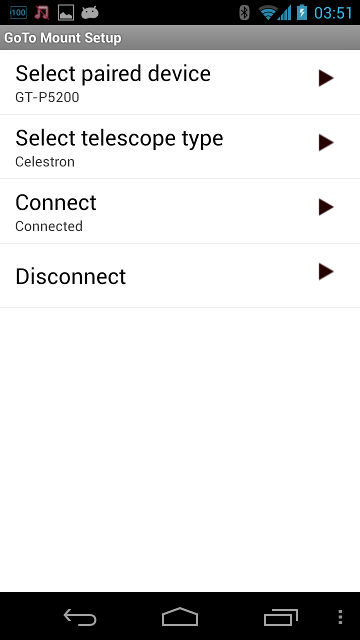
- Figure 18: GoTo Mount Setup panel screenshots
(using bright theme)

(GoTo button on the Details screen)


The GoTo Mount Setup module allows to setup the bi-directional communication with a GoTo telescope mount over the Bluetooth wireless connection of the Android device. At the moment, DSO Planner supports GoTo control commands of select Celestron (16- and 32-bit), SkyWatcher (16- and 32-bit) and Meade telescope models, such as Meade ETX-125 and Celestron CPC. In order to control them from your Android device you need to convert the wired serial port signal of the telescope mount into the wireless Bluetooth signal. In most cases you need to purchase an RS-232 to Bluetooth converting dongle (sometimes called Wireless Serial Port Extender) and properly connect and power it using your mount's ports or external wiring.

Note, that with some adapters you might need to add a Null-Modem adapter between the dongle and the mount's serial cable connector, or simply swap the Rx and Tx lines in your DIY cable. It is safe to experiment with that.

For example, here is the Alex's Meade ETX-125 mod, providing that connectivity. Any RS-232 dongle you could find should work just fine with DSO Planner. However, some telescope models might require the communication protocol tweaking in the code. Please don't hesitate to report any issues with your GoTo setup on our forum! Some of the telescope manufacturers may provide the Bluetooth dongle dedicated for their mounts, but there are plenty much cheaper dongles available on the market, including the eBay. Also, if you have electronics skills you might integrate a Bluetooth circuit right into your GoTo mount housing.

Note: the frequent error with such integrated Bluetooth circuits approach is selecting the wrong circuit, i.e. intended for use with Arduino SoC. TTL and CMOS versions are incompatible with most of the GoTo serial ports out of the box. You will need an additional CMOS/TTL to RS232 voltages converter IC, such as MAX-232, to make it work with the telescope.
Connection setup
To register your telescope for Bluetooth control:
- Open Android Settings and find "Bluetooth" in the "Wireless and Networks section" at the top
- Turn it on.
- Turn on your GoTo Telescope mount power, initialize it using the Telescope users manual.
- Turn on the Bluetooth radio of the Telescope (or insert the BT dongle).
- Tap the "Bluetooth" item in the Android Settings and pair the phone/tablet with the Telescope BR controller.
GoTo Mount Setup screen
To setup the Bluetooth control of your telescope in DSO Planner:
- Open DSO Planner.
- Open the Settings module and open the "Astro Equipment" item there.
- Find the "GoTo Mount Settings..." option either in the Settings module's "Astro Equipment" chapter, or in the Star Chart module's Settings "Equipment" chapter.
- Tap it to open the BT control panel.
In the panel (refer to the the Fig.18 above):
- Select paired device — Select your telescope from the list of previously paired telescopes.
- Select telescope type — Select your telescope type (Celestron or Meade).
- Connect — Initiate connection between phone/tablet and the telescope.
- Disconnect — Break the Bluetooth connection with the telescope.
How to use
- Point to an object —
- Select the target object in any DSO Planner module (e.g. on the Star Chart).
- Open the Details screen module for it.
- Tap the "GoTo" button in the top right corner of the module's screen.
- Make the Star Chart to center where the telescope is pointing to.
- Tap the "Scope go" item in the Main menu of the Star Chart module.
Advanced Telrad
The DSO Planner's Telrad overlay feature of the Star Chart module could be of a great help with the "semi-blind" pointing of your Alt-Azimuth mounted telescope (Dob) to hidden deep sky objects with just your naked eyes, if used properly. The most popular Telrad device (see the picture below) has an often overlooked, but the very important feature - gaps in the circles at 12, 3, 6, and 9 hours. They could be efficiently utilized to position Telrad rings between bright stars exactly as on the Star Chart, thus immediately bringing the centered object into the eyepiece's FOV. You just need to spend 5-10 minutes configuring that feature once and learn using the gaps to tell directions to the stars reliably. This technique resolves the "star-less regions" issue as well, as it is often good enough to have just one base star visible nearby to "dial-in" any object within up to 5 degrees from the target object.
- Figure 21: Working with Telrad
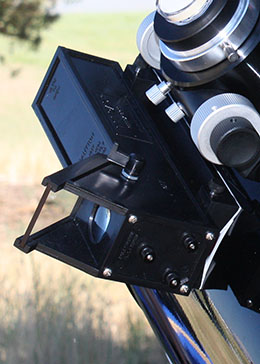
(Popular telrad model)
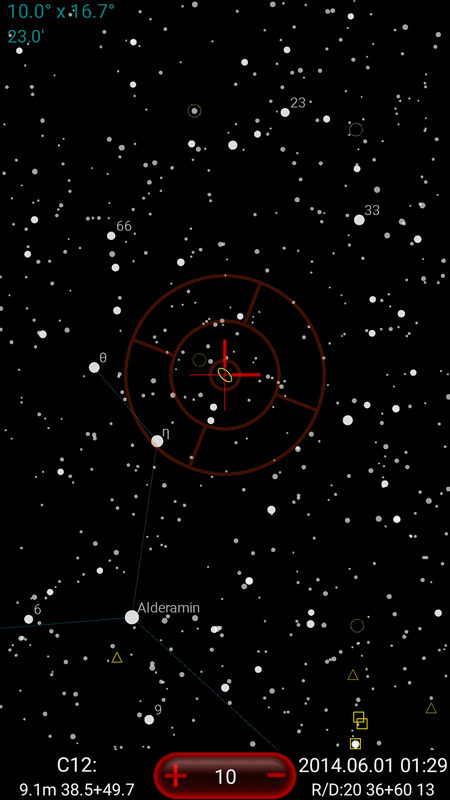
(Starchart excerpt)
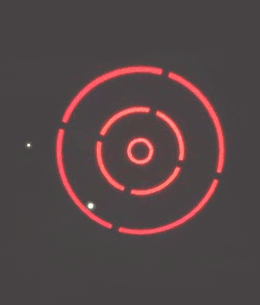
(Advanced Telrad use)


For example (refer to images with circles above): to point at the object in the center of the Chart (C12 on the Chart above), all you need is a single naked eye reference star nearby (Eta 3 above). Just note the "hour" at which it's shown on the Chart and the distance from the nearest Telrad ring (you can use the distance between rings and/or the ring's line width to measure it precisely) and move the telescope to match that on the sky. Usually, I'm simply holding the phone on the left from Telrad and matching the pictures I see directly side by side. In our example, we want to place Telrad circles so the star is visible very close to the outer ring at the slightly less than 7 hours imaginary mark. Voila! In less obvious cases or when in doubt you may consider using 2 - 4 stars around and within the Telrad rings to match the views by building various lines between them and matching their relations with the rings. But with the experience, I've got used relying on just a single star even in the poorest regions of the sky lacking bright enough stars abundance around.
That technique became possible and is highly efficient because DSO Planner is constantly tracking the orientation of the Telrad's view and also providing precise manual controls for the circles' overlay sizes, gaps orientation, circles outline thickness, color, and transparency (see the Start Chart Settings Menu, Equipment section) in order to model the real thing exactly as you see it. If you care to maintain a fairly leveled scope base and carefully calibrate your particular Telrad once (use pairs of stars to set sizes of circles, gaps orientation, and lines width, and don't forget to align the Telrad center with the EP's FOV center per its instruction manual as well), then pointing to any object, even close to Zenith, will be faster than anything I ever tried, including best motorized equatorial GoTo mounts on the market. It is also very natural and keeps you attached to the starry sky no to the controllers' dials and battery gauges.
Tip: When mounting your Telrad on the OTA - make sure you have one of the gaps pointing more or less upward, so you can quickly figure which one will be 12 o'clock. I have mine installed on the side of the OTA, below the EP (see the image above), I like using it that way better, even though that means my 12 o'clock is actually 3 in the typical installation.
Note: On the DSO Planner Star Chart the Telrad gaps are replaced with the crosshair lines, as that makes directional angles measuring more determinating.